Seriously though, I've been gone for months now...what on earth have I been doing?
Simply put, class. Between academic classes and then going back into labs, I have been busy.
Okay, so, the way my labs work, I have 5 different classes, each one is 9 days long and last 6 hours each day we are in the lab. So, 6 hours, 9 days, Mondays-Thursdays only, and 5 different class, one after the other. That has been my life, I am almost done with my 4th lab class (advanced artisan bread) and I am almost to graduation! Oh, and packing on the weekends. Gotta completely move out and back home after graduation so that means going through EVERYTHING I own here. And that's a lot.
Okay, so I'm going to try and do a 'by class' kinda thing and give a few brief descriptions (I am going to be doing a lot more detail and tips on later posts).
My first class, Sugar Artistry. This class is for the person who is very patient. Seriously. You can easily get frustrated (I know I did) and you need to be patient and very, very gentle. Beside that, it's a lot fun to do.
I had to create a showpiece and that was all we did for the entire 9 days, construct these pieces. And for mine, I did Hagrids Hut with Buckbeak outside. I am overly proud of how this piece turned out. There are a few things that could be better, but for someone who has never worked with sugar like this, it's pretty great.
I made the pieces of the body out of a clear pulled/blown sugar. To make it so clear, it's made using Isomalt, a sugar substitute. I don't really like using it, but it was needed for the clear pieces. Then, using a sugar color and adding some alcohol to it, I painted on the decorations, very abstractly.
I of course wanted some pumpkins, I mean, Hagrids Hut without the iconic pumpkin patch? No thank you. So, I made some and it was a lot of fun and I love them! For these, when you are blowing the sugar, you would pump air, quickly mark it, pump air back into it, mark again, and do this until the look sticks, and then when it is, you hold the center in, and pump so you get that signature pumpkin look. And then finally, I just painted on the vines, if I had like a couple more hours, I would have made some out of pulled sugar, but I didn't so I just painted them.
A quick tip: When gluing big pieces of sugar (the hut), make sure it is warmed up before you do. If you don't and you go to glue with HOT sugar, the piece will crack and/or shatter. It's not fun and it's a big pain to try and come back from. Luckily I didn't have that happen to me, but it does happen.
For Buckbeak, do NOT heat him up to glue together, just slightly melt the piece where it will be connecting and stick it. You heat this up, it will just deflate and that is no good.
Advanced Specialty Cakes
My next class was an advanced cakes class and the way we did it, it was like all out cakes were for this couple. All the way from the Engagement cake to the first anniversary cake.
This is the Engagement Torte, a hazelnut cake (made with hazelnut flour instead of regular flour) with praline butter cream and glazed in milk chocolate. The white decor on the top is made out of Marzipan, a fondant like paste that is made with Almond Paste. I personally don't like it because it's so hard to work with, it just wants to wilt and not be pretty. The shell boarder is made out of Marzipan as well, but using a shell tool, we pressed in the shapes to give it that ruffle look. And finally, for the piping on the top boarder and the heart, it is used piping chocolate, or scrivosa and water.

Next we did a cake for the mother-in-law. This is just a small present cake with just vanilla pound cake and vanilla butter cream. The decor on the outside is made out of fondant and the bow and ribbon is made with gum paste. Gum Paste is a lot like fondant but when it dries, it is stiff and hard, keeping the shape you want. To hold it all together on the top, we used Royal Icing, a powder sugar and egg white mixture.

Next we did the Bridal Shower cake. This is a traditional basket cake and was really fun to make. You stack cakes, trim them to be somewhat the shape you want (this cake has a LOT of icing on it by the way), and then to get a slightly rounded top, you make a mixture with cake crumbs (use the trimmings) and butter cream. Then put it on the top and smooth it to the roundedness you want. Crumb coat, then do a basket weave. To do this, we used a round tip and did all of the downward stripes first., then using a star tip, we did the basket weave and the shell boarder on the top and bottom. For the handle, we used gum paste and then dipped the ends in chocolate, let it harden, and then stuck it in. Why chocolate? So that the gum paste wouldn't soften and melt and then the handle would fall over.

For the flowers, we did butter cream roses. We used two colors to give it some variety and made them in varying sizes. Then, we froze them. This way, when we went to put them on the cake, they wouldn't squish and deform.Then, we filled in all the gaps with a bunch of thick, green royal icing leaves.

Next cake was the grooms cake, however, at that time a competition was being held on campus, an Edible Book Contest. So, we did cakes for that instead. I did Beauty and the Beast because it's my favorite movie. I tried to replicate the stained glass image but didn't do too great of a job. I didn't press hard enough into the fondant that I was doing this on and so the lines were hard to see. Then, the black royal icing was just not coming out right. However, I was still really proud of it until I got to the faces. This isn't my proudest moment, however, I still take pride in my piece, I tried and that is what matters. I'm in class still learning and that is what counts. However, it did turn out pretty well, just wish I had gotten a little more of a fleshy color of the skin. Oh well.

For the side, I painted on the letters and then made fondant rose and rose petals and scattered them around. I wish I had done a stem for it and made it handing off the side but I didn't think to do that until after the fact. You can't read it in this picture but on the side I paid homage to the original french story written by Jeanne-Marie Leprince de Beaumont.
The next cake and part of our Final for the class, we made wedding cakes. Doesn't look like it, but this is a very small cake, an 8 inch, 6 inch, and probably a 3.5/4 inch on the top. (we used round cutters and stamped out of a sheet cake for that tier). The flowers are made of gum paste, all are very beautiful (in my opinion anyway). Then the piping is made from Royal Icing. This cake was my proudest moment for this year, I am beyond thrilled with out this cake turned out.
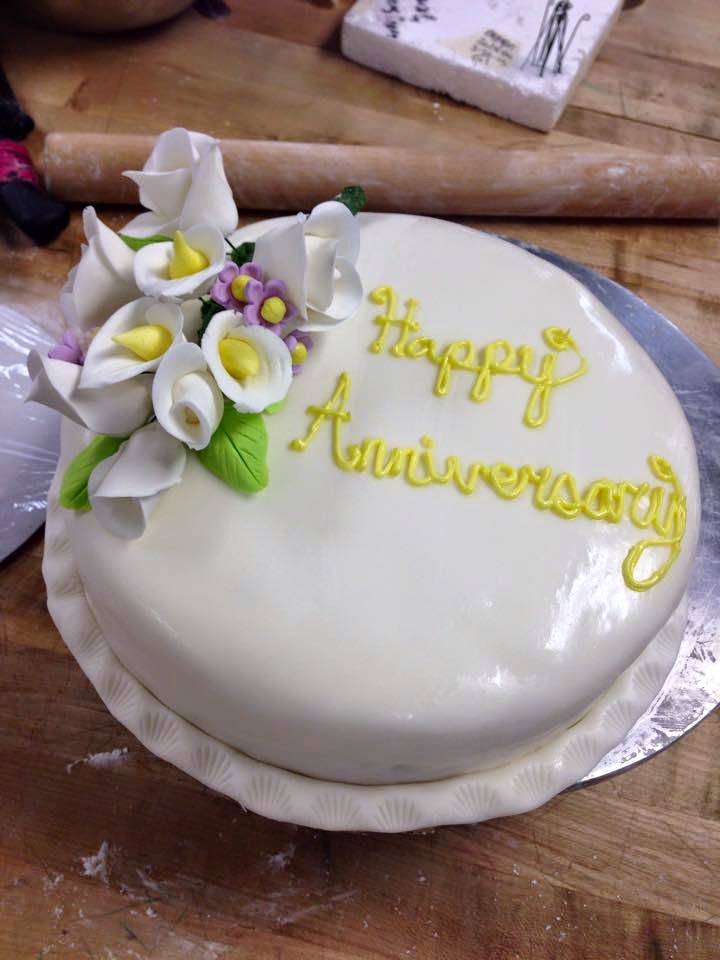
Then lastly, the Anniversary Cake. Very, very basic. It's made with a gum paste flower bouquet on the top and yellow royal icing piping.
Entremets/ Petite Getaux
First off, what on earth is that? Well, it's a layered cake, made with anywhere from 5+ flavors and made using different textures that compliment each other.
This is a Petite Getaux, which is a smaller verison of an Entremet, and is usually only like 3 flavors, and also is single serving size, so small. This particular one is called Baumkuen, a German cake that is baked one later at a time. Each layer is added and then is baked again. Then, you trim it thinly and line the outside of a mold and fill that with a yogurt mousse filling. Then,the base is added, we used lady fingers, and then freeze it. Once it's done, it's flipped out and trimmed down to size.
This is another Petite Getaux, the base is a chocolate chip cookie, then chocolate mousse and topped off with an "oreo" mousse, we made it using a short cookie dough recipe.
This is a peanut butter enteremet. Base is peanut brittle, then chocolate glaze, then peanut mousse, chocolate sponge cake, and another layer of peanut butter mousse. Finally it gets glazed and decorated. And trust me, it's delicious.
For my practical, I had to recreate a dish from my childhood and I chose milk and cookies. This was the most delicious thing I have tasted in a while.
Inside view of the dish. Base is a chocolate chip cookie, then vanilla mousse ("milk", chocolate sponge cake, chocolate mouse (it tasted like chocolate milk), another cake, then oreo mousse using a homemade oreo cookie. Finally, glazed and decorated.
Where am I now?
Advanced Artisan Breads
This class is the death of me, I eat so much bread all the time now...
This one is a dark rye bread and we amde it in a cloth basket. The basket is dusted with flour (that goes with the bread, don't use rye flour if there is no rye in your bread...) and then the bread is placed inside and proofed. Once it's ready to bake, you gently take it out of the basket, flip it over so it's smooth, then score it how you like.
Pumpkin bread, this one is delicious, I just wish it had more of a pumpkin flavor, needed more puree but that's the recipe, not me. Next time I make it, I will for sure add more puree to it and less seeds inside the dough.
Another dark rye, made the same just in a different basket.
Raisin and walnut bread. This bread is the most delicious thing ever. Seriously, it's so good. A nice crispy crust and soft, airy middle. What a bread should be. Next time though, I'm adding cinnamon to the dough.
Marble Rye! This one is so delicious and very simple. Just a dark rye and light rye rolled together. It's so delicious and super easy to make.
So that is what I have been up to. I swear I didn't die, I just got busy. I know I said a quick post and I went into a little more detail than intended, but hey, I have a lot to say about these things! I promise, once summer hits, I will be posting a lot more tutorial type things again. I apologize for not being able to right now!
Stay Awesome Guys! <3